Heroku Log Tail — Advanced Tools & Tips

Adam McCrea
@adamlogicYour log data is a treasure-trove of information about your application, but it can be overwhelming. This post will dig into several strategies for extracting metrics and other helpful information from your logs. We’ll start with the basics of the heroku logs command, then we’ll dig into the real fun using a tool called Angle Grinder.
How to view your Heroku logs
heroku logs on its own just prints the most recent logs from your app and then exits. Generally that's not very useful. I almost always want the -t (or --tail) option to continually tail my logs. Additionally I usually want it scoped to a specific dyno process, so I’ll include -d router, -d web, or -d worker so I’m only seeing relevant logs.
Here's how I would tail my router logs:
heroku logs -t -d router

2021-07-28T16:23:07.870849+00:00 heroku[router]: at=info method=POST path="/api/REDACTED/v2/reports?dyno=web.8&pid=4" host=api.railsautoscale.com request_id=0ce66277-877c-4d4f-91c4-2c1075089b41 fwd="3.84.54.241,172.70.34.122" dyno=web.7 connect=1ms service=156ms status=204 bytes=358 protocol=https
2021-07-28T16:23:07.774247+00:00 heroku[router]: at=info method=POST path="/api/REDACTED/v2/reports?dyno=web.3&pid=81" host=api.railsautoscale.com request_id=fe46b69d-8938-4d41-a566-4c837050f6da fwd="3.85.98.203,172.69.62.61" dyno=web.14 connect=1ms service=14ms status=204 bytes=358 protocol=https
2021-07-28T16:23:07.627308+00:00 heroku[router]: at=info method=POST path="/api/REDACTED/v2/reports?dyno=web.1&pid=11" host=api.railsautoscale.com request_id=f5b69be4-8283-48f6-b683-30c051b4f51d fwd="34.232.107.232,172.70.42.94" dyno=web.11 connect=0ms service=327ms status=204 bytes=358 protocol=https
2021-07-28T16:23:07.740752+00:00 heroku[router]: at=info method=POST path="/api/REDACTED/v2/reports?dyno=web.4&pid=4" host=api.railsautoscale.com request_id=89d2da0d-e1d8-484d-99f2-bf26921ba9a5 fwd="3.249.54.29,162.158.158.123" dyno=web.11 connect=0ms service=354ms status=204 bytes=358 protocol=https
2021-07-28T16:23:07.881220+00:00 heroku[router]: at=info method=POST path="/api/REDACTED/v2/reports?dyno=web.1&pid=24539" host=api.railsautoscale.com request_id=37171239-4524-46cf-9dce-7cdda8bd4ace fwd="3.95.158.194,172.70.34.173" dyno=web.20 connect=2ms service=34ms status=204 bytes=358 protocol=https
2021-07-28T16:23:07.743590+00:00 heroku[router]: at=info method=POST path="/api/REDACTED/v2/reports?dyno=web.1&pid=50" host=api.railsautoscale.com request_id=bb063a51-8d83-4284-b26a-db31c3f4b485 fwd="54.204.194.19,172.70.34.122" dyno=web.8 connect=1ms service=19ms status=204 bytes=358 protocol=https
Scoping it further
Even with the -d filter, it’s usually way too much data to be useful, so I’ll want to filter it even more. This is where chaining with grep is useful.
Here I'll tail my worker logs, but only show the entries that include "StatWorker":
heroku logs -t -d worker | grep StatWorker

2021-07-28T16:28:11.718082+00:00 app[worker.18]: pid=4 tid=1fzk class=StatWorker jid=bae74463b8a3c977aaaac6b4 args=3061,2021-07-28T16:27:50Z measure#sidekiq.queued=1069 tag#worker=StatWorker tag#queue=default INFO: start
2021-07-28T16:28:11.763375+00:00 app[worker.18]: pid=4 tid=1fy4 class=StatWorker jid=2c4de245191802b57344bae8 args=2344,2021-07-28T16:27:50Z measure#sidekiq.queued=933 tag#worker=StatWorker tag#queue=default elapsed=0.181 INFO: done
2021-07-28T16:28:11.782176+00:00 app[worker.18]: pid=4 tid=1fy4 class=StatWorker jid=c704e40d09cf93b628d023f3 args=3000,2021-07-28T16:27:50Z measure#sidekiq.queued=1129 tag#worker=StatWorker tag#queue=default INFO: start
2021-07-28T16:28:11.809741+00:00 app[worker.18]: pid=4 tid=1fzk class=StatWorker jid=bae74463b8a3c977aaaac6b4 args=3061,2021-07-28T16:27:50Z measure#sidekiq.queued=1069 tag#worker=StatWorker tag#queue=default elapsed=0.092 INFO: done
2021-07-28T16:28:11.820178+00:00 app[worker.18]: pid=4 tid=1fzk class=StatWorker jid=7af1852ff673a9f747d8f4ad args=1920,2021-07-28T16:27:50Z measure#sidekiq.queued=1171 tag#worker=StatWorker tag#queue=default INFO: start
2021-07-28T16:28:11.719832+00:00 app[worker.20]: pid=4 tid=13c4g class=StatWorker jid=c531a39bf63886c8ce386c13 args=3826,2021-07-28T16:27:50Z measure#sidekiq.queued=922 tag#worker=StatWorker tag#queue=default elapsed=0.149 INFO: done
2021-07-28T16:28:11.721947+00:00 app[worker.20]: pid=4 tid=13c4g class=StatWorker jid=4e2884278d99fb616eb452b1 args=1546,2021-07-28T16:27:50Z measure#sidekiq.queued=1073 tag#worker=StatWorker tag#queue=default INFO: start
2021-07-28T16:28:11.761234+00:00 app[worker.20]: pid=4 tid=8rk60 class=StatWorker jid=9f54c9b8418801e4274f0fe7 args=2191,2021-07-28T16:27:50Z measure#sidekiq.queued=928 tag#worker=StatWorker tag#queue=default elapsed=0.184 INFO: done
This uses a "pipe" to send the output of heroku logs as input to the grep utility. Grep searches plain text data using regular expressions. We're not using any regexp syntax in this example, but we certainly could.
Check out the Better Stack guide to logging on Heroku for an exhaustive overview, including logging basics and best practices.
Chaining heroku logs -t with grep is how I’m most often interacting with my Heroku logs, but sometimes I need more power.
Extracting specific values
It's time to meet Angle Grinder, a real-time log analysis power tool. It can parse many formats, extract values, and even perform aggregations. Let’s just dive right in with an example.
Heroku’s router logs are formatted the same for every Heroku app, so let’s use those. Here’s the same router log output we saw above:
heroku logs -t -d router

2021-07-28T16:23:07.870849+00:00 heroku[router]: at=info method=POST path="/api/REDACTED/v2/reports?dyno=web.8&pid=4" host=api.railsautoscale.com request_id=0ce66277-877c-4d4f-91c4-2c1075089b41 fwd="3.84.54.241,172.70.34.122" dyno=web.7 connect=1ms service=156ms status=204 bytes=358 protocol=https
2021-07-28T16:23:07.774247+00:00 heroku[router]: at=info method=POST path="/api/REDACTED/v2/reports?dyno=web.3&pid=81" host=api.railsautoscale.com request_id=fe46b69d-8938-4d41-a566-4c837050f6da fwd="3.85.98.203,172.69.62.61" dyno=web.14 connect=1ms service=14ms status=204 bytes=358 protocol=https
2021-07-28T16:23:07.627308+00:00 heroku[router]: at=info method=POST path="/api/REDACTED/v2/reports?dyno=web.1&pid=11" host=api.railsautoscale.com request_id=f5b69be4-8283-48f6-b683-30c051b4f51d fwd="34.232.107.232,172.70.42.94" dyno=web.11 connect=0ms service=327ms status=204 bytes=358 protocol=https
2021-07-28T16:23:07.740752+00:00 heroku[router]: at=info method=POST path="/api/REDACTED/v2/reports?dyno=web.4&pid=4" host=api.railsautoscale.com request_id=89d2da0d-e1d8-484d-99f2-bf26921ba9a5 fwd="3.249.54.29,162.158.158.123" dyno=web.11 connect=0ms service=354ms status=204 bytes=358 protocol=https
2021-07-28T16:23:07.881220+00:00 heroku[router]: at=info method=POST path="/api/REDACTED/v2/reports?dyno=web.1&pid=24539" host=api.railsautoscale.com request_id=37171239-4524-46cf-9dce-7cdda8bd4ace fwd="3.95.158.194,172.70.34.173" dyno=web.20 connect=2ms service=34ms status=204 bytes=358 protocol=https
2021-07-28T16:23:07.743590+00:00 heroku[router]: at=info method=POST path="/api/REDACTED/v2/reports?dyno=web.1&pid=50" host=api.railsautoscale.com request_id=bb063a51-8d83-4284-b26a-db31c3f4b485 fwd="54.204.194.19,172.70.34.122" dyno=web.8 connect=1ms service=19ms status=204 bytes=358 protocol=https
You’ll notice that the metadata is all formatted as [key]=[value]. This format is called logfmt. It's embraced heavily by Heroku, and it’s one of the many formats that Angle Grinder understands.
Go follow the Angle Grinder installation instructions then come back to follow along.
Let's use Angle Grinder's logfmt parsing for Heroku router logs.
heroku logs -t -d router | agrind '* | logfmt'

[2021-07-28T16:50:11.654197+00:00=None][at=info][bytes=358][connect=1ms][dyno=web.2][fwd=54.154.157.222,162.158.159.109][heroku[router]:=None][host=api.railsautoscale.com][method=POST][path=/api/REDACTED/v2/reports?dyno=web.3&pid=79][protocol=https][request_id=d4ecf840-666b-430f-81c3-082b4e58c876][service=29ms][status=204]
[2021-07-28T16:50:11.450697+00:00=None][at=info][bytes=358][connect=4ms][dyno=web.18][fwd=34.233.123.109,172.69.62.81][heroku[router]:=None][host=api.railsautoscale.com][method=POST][path=/api/REDACTED/v2/reports?dyno=web.5&pid=242][protocol=https][request_id=1599b9f0-17ec-48ae-8341-5d917bcbd598][service=19ms][status=204]
[2021-07-28T16:50:11.644107+00:00=None][at=info][bytes=358][connect=1ms][dyno=web.16][fwd=3.84.186.26,172.70.38.19][heroku[router]:=None][host=api.railsautoscale.com][method=POST][path=/api/REDACTED/v2/reports?dyno=web.1&pid=9][protocol=https][request_id=2bef6858-458f-47f9-9e97-8c35c4d9ebef][service=12ms][status=204]
Okay, that's really not any better than before. We can see that the key-value pairs were parsed, but it's still just a wall of text.
Let's try again, this time using the --format option to only display the "connect" and "service" metrics from the router logs.
heroku logs -t -d router | agrind '* | logfmt' --format '{connect} {service}'

2ms 9ms
1ms 160ms
1ms 15ms
0ms 6ms
4ms 192ms
Now we're getting somewhere! Let's expand the formatting string to display even more data, along with some defined widths so we have control over the alignment. We'll also split the command into multiple lines to make it more readable.
heroku logs -t -d router | agrind \
  '* | logfmt' \
  --format '{dyno:<6} {connect:6} {service:7} {status:4} {method:5}  {path}'

web.3     0ms    52ms  204  POST  /api/REDACTED/v2/reports?dyno=web.1&pid=37
web.23    1ms    17ms  204  POST  /api/REDACTED/v2/reports?dyno=web.2&pid=4
web.4     1ms    40ms  204  POST  /api/REDACTED/v2/reports?dyno=web.3&pid=186
web.1     1ms    17ms  204  POST  /api/REDACTED/v2/reports?dyno=web.1&pid=86
web.13    1ms    10ms  204  POST  /api/REDACTED/v2/reports?dyno=web.21&pid=65
Beautiful! We've broken the wall of text into a nicely-aligned, human-readable stream of output. You can use this to watch your web traffic in real-time. From this we could quickly see if a particular dyno is struggling, or if a particular path is being requested more frequently than we expect.
How does Angle Grinder work?
Okay, let's peel apart that last example.
First we tail Heroku logs using the Heroku CLI, just like before:
heroku logs -t -d router
Then we pipe the output to agrind (just like we were piping to grep before). agrind takes a single argument—called the "query"—which tells Angle Grinder how to process the incoming text. Queries can get complex as we'll soon see, but this example keeps it simple:
heroku logs -t -d router | agrind '* | logfmt'
Here, the query is * | logfmt, and we enclose it in single quotes to separate it from the rest of the command. It might look a bit odd seeing the "pipe" character within the query string, so take care to not confuse it with a command line pipe.
The Angle Grinder query syntax is a composition of an initial filter with a series of operators. Here's how this query breaks down:
*– This is the initial filter, and it tells Angle Grinder to operate on every input line.logfmt– This is an operator, and it extracts key/value fields using the logfmt syntax.
The first operator is generally a parser. Next we'll see how subsequent operators would then operate on the extracted fields.
Aggregating your log data in real-time
With a steady volume of requests, what we've seen so far can still be an overwhelming amount of information. Depending on what we're looking for, we can use Angle Grinder's aggregate operators to summarize log data in real-time.
For example, here's a snapshot of 50th and 95th percentile service times by dyno:
heroku logs -t -d router | agrind \
  '* | logfmt | p50(service), p95(service), count by dyno | sort by p50 desc'

dyno         p50        p95        _count
-------------------------------------------------
web.2        57         369        622
web.3        40         287        622
web.1        36         114        598
web.7        18         306        612
web.5        15         93         641
web.6        13         41         631
web.4        9          25         576
Now our Angle Grinder query has gotten a bit more complex, with several operations chained together:
*– Operate on every input line.logfmt– Extract fields using the logfmt parser.p50(service), p95(service), count by dyno– Calculate three aggregates grouped by the "dyno" field. This assumes a "dyno" field was extracted vialogfmt, which it was. The output of this operation is three fields: "p50", "p95", and "_count".sort by p50 desc– Sort the aggregate results by the "p50" field.
We could change the order of these fields, rename them using "as", or query multiple fields:
heroku logs -t -d router | agrind \
  '* | logfmt | count as count, p95(connect) as connect, p95(service) as service by dyno | sort by p50 desc'

dyno          count        connect        service
---------------------------------------------------------
web.3         618          1              84
web.1         693          1              93
web.6         623          2              62
web.4         624          1              20
web.5         674          2              561
web.2         673          2              573
web.7         621          4              191
The query is getting hard to read, so I'd split it to many lines:
heroku logs -t -d router | agrind \
  '*
    | logfmt
    | count as count,
      p95(connect) as connect,
      p95(service) as service
      by dyno
    | sort by p50 desc'
Parsing more than just logfmt
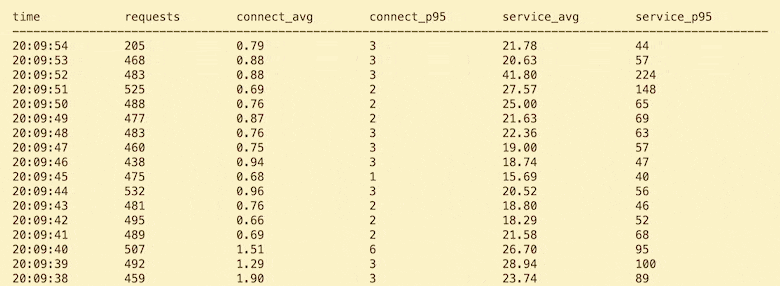
One query I find very handy is grouping by the second. This let’s me see a live second-by-second summary of how my app is performing. I'll use this when there's a production bottleneck so I can see exactly when the issue is resolved.
heroku logs -t -d router | agrind \
  '*
    | parse "T*." as time
    | logfmt
    | count as count,
      p95(connect) as connect,
      p95(service) as service
      by time
    | sort by time'

time            count        connect        service
-----------------------------------------------------------
19:20:36        354          2              1452
19:20:37        492          2              825
19:20:38        519          1              740
19:20:39        513          3              270
19:20:40        435          2              74
19:20:41        451          4              76
19:20:42        468          4              82
This query introduces a new parser called parse. For this aggregation, I needed the time string truncated to the second, and that’s not available in the logfmt data. parse gives us the power of arbitrary string matching to pull out values from anywhere in the log line.
Here an example raw router log for reference:
2021-07-28T16:23:07.870849+00:00 heroku[router]: at=info method=POST path="/api/REDACTED/v2/reports?dyno=web.8&pid=4" host=api.railsautoscale.com request_id=0ce66277-877c-4d4f-91c4-2c1075089b41 fwd="3.84.54.241,172.70.34.122" dyno=web.7 connect=1ms service=156ms status=204 bytes=358 protocol=https
Notice that the timestamp precedes the logfmt data, and it is not formatted as a logfmt key/value pair.
parse "T*." as time extracts a single field, "time", using the pattern T*.. The asterisk (*) is a wildcard, and anything it consumes is extracted as a field. So a single asterisk means a single field is extracted. The text between T and . is 16:23:07, so that becomes the value for "time".
From there, it's all what we've seen before: logfmt to parse the logfmt data, then aggregate operations, then sorting the output.
Conditional aggregates
One last example to show how we can use conditional logic in our queries.
heroku logs -t -d router | agrind \
  '*
    | parse "T*." as time
    | logfmt
    | count(status == 200) as successful,
      count(status != 200) as failure,
      p95(service) as service,
      p95(connect) as connect
      by time
    | sort by time desc'

time            successful        failure        service        connect
-------------------------------------------------------------------------------
19:41:58        189               244            1803           1
19:41:57        182               120            2076           1
19:41:56        191               163            2479           1
19:41:55        174               122            2300           1
19:41:54        176               97             2196           1
This example is taken from a different app, and it's not doing so well. Over half of the requests are failing. 😱
Still, it's pretty cool that we can use conditionals in our count aggregate using extracted logfmt fields like "status".
Your turn
Hopefully by now you've installed Angle Grinder, and you're having some fun slicing and dicing your own log data.
Our Heroku log stream can be completely overwhelming, but tools like heroku logs, grep, and especially agrind give us everything we need to get useful and actionable information from the firehose.