Introduction
Getting started with Judoscale on Amazon ECS (AWS)
Judoscale integrates with Amazon ECS to autoscale your AWS deployments. Check out the video below for a quick overview of how Judoscale works with Amazon ECS.
Getting Started
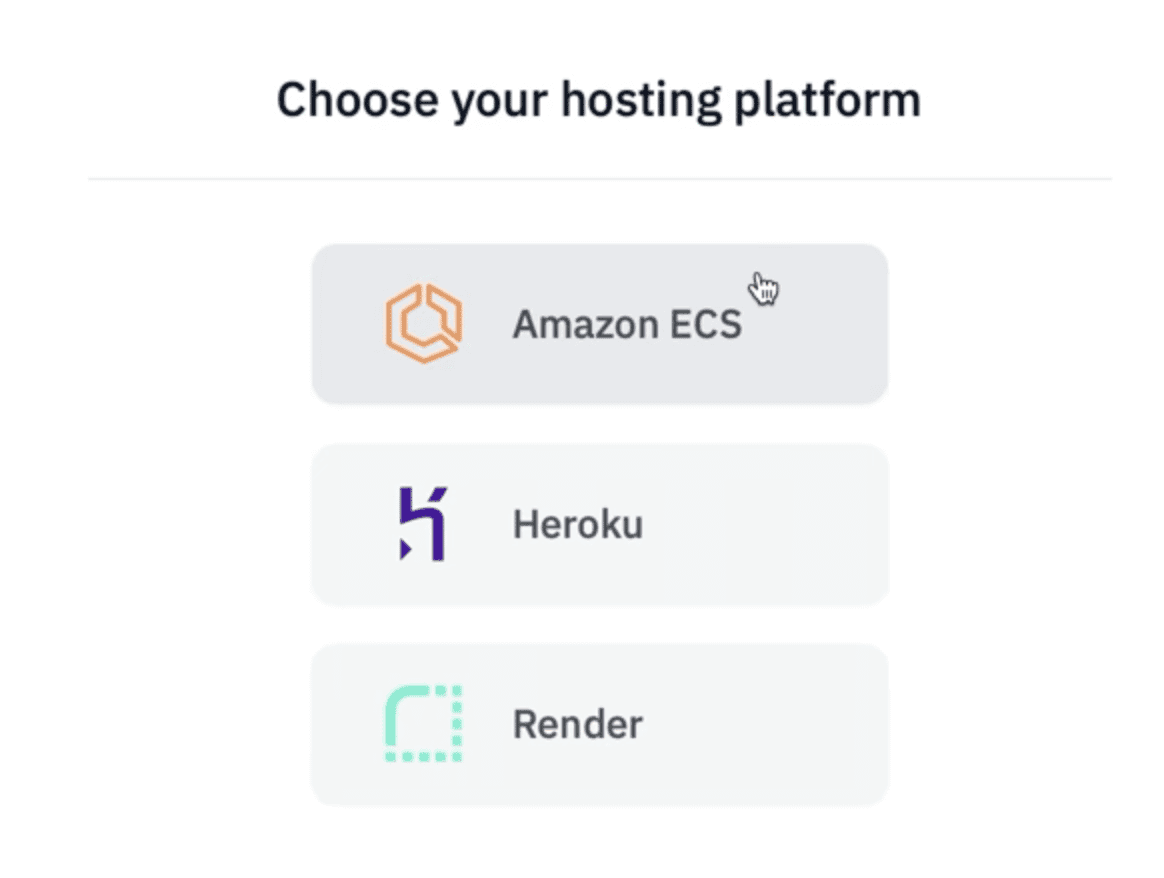
Sign up for a Judoscale account, and select “Amazon ECS” for your hosting platform.
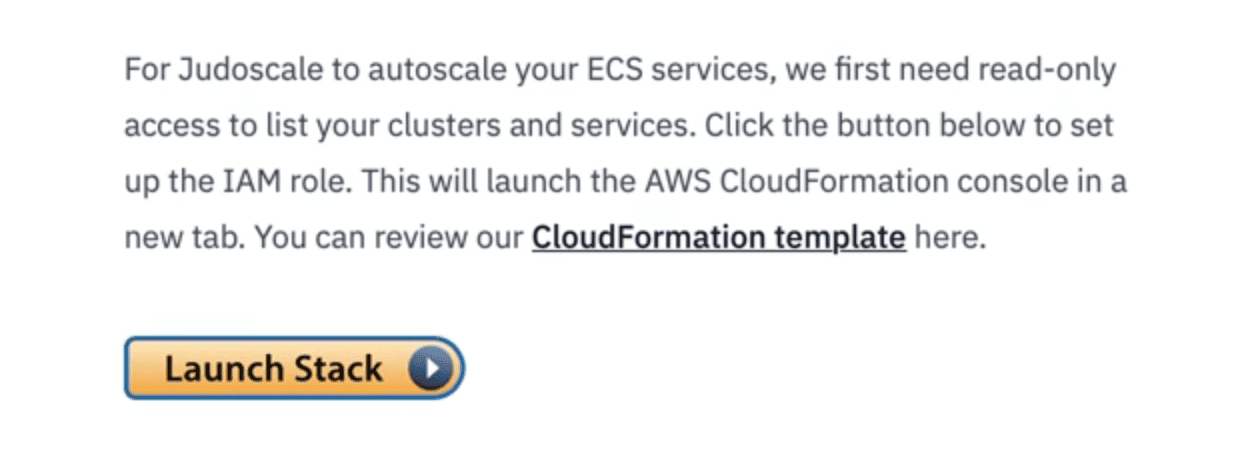
Next, we provide a CloudFormation template that creates a read-only IAM role for Judoscale. Click the “Launch Stack” button to open CloudFormation and run the stack.
After the stack has completed, you’ll paste the IAM role ARN into Judoscale.
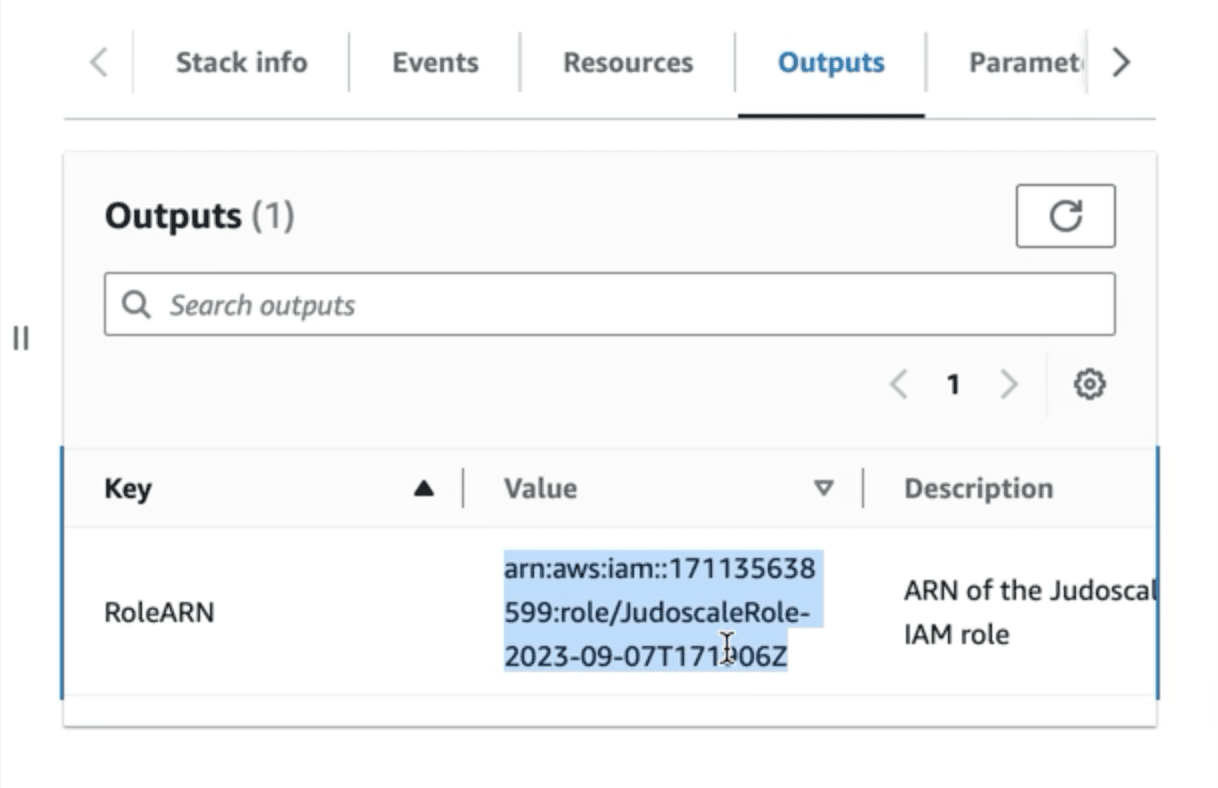
This IAM role is read-only, and cannot modify your ECS clusters or services. Judoscale needs this role to list your ECS clusters and services in the next step.
For more details on our IAM setups, see here
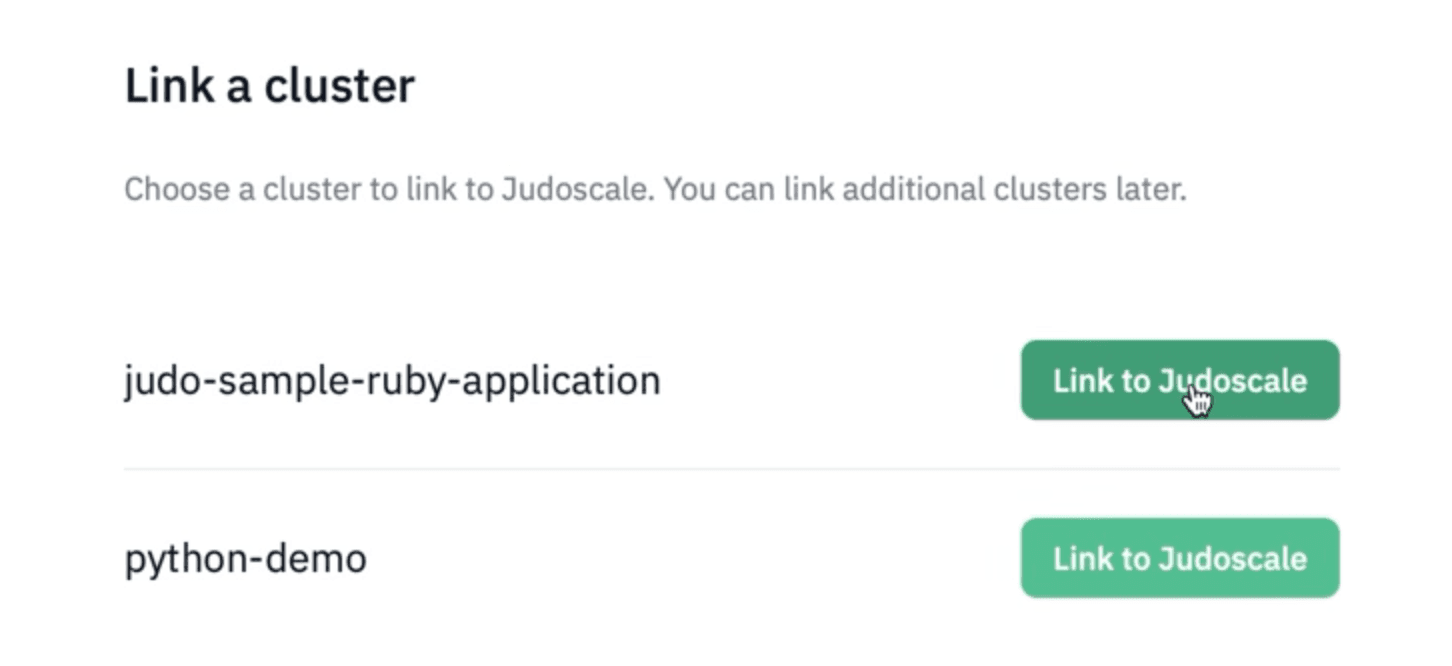
Now select the cluster you want to link to Judoscale.
Judoscale will list all services in the selected cluster. Check the services you want to link to Judoscale, and select whether they are web or worker services. This impacts how Judoscale scales your services—web services are autoscaled based on request queue time, and worker services are autoscaled based on queue latency (a.k.a. “job queue time”).
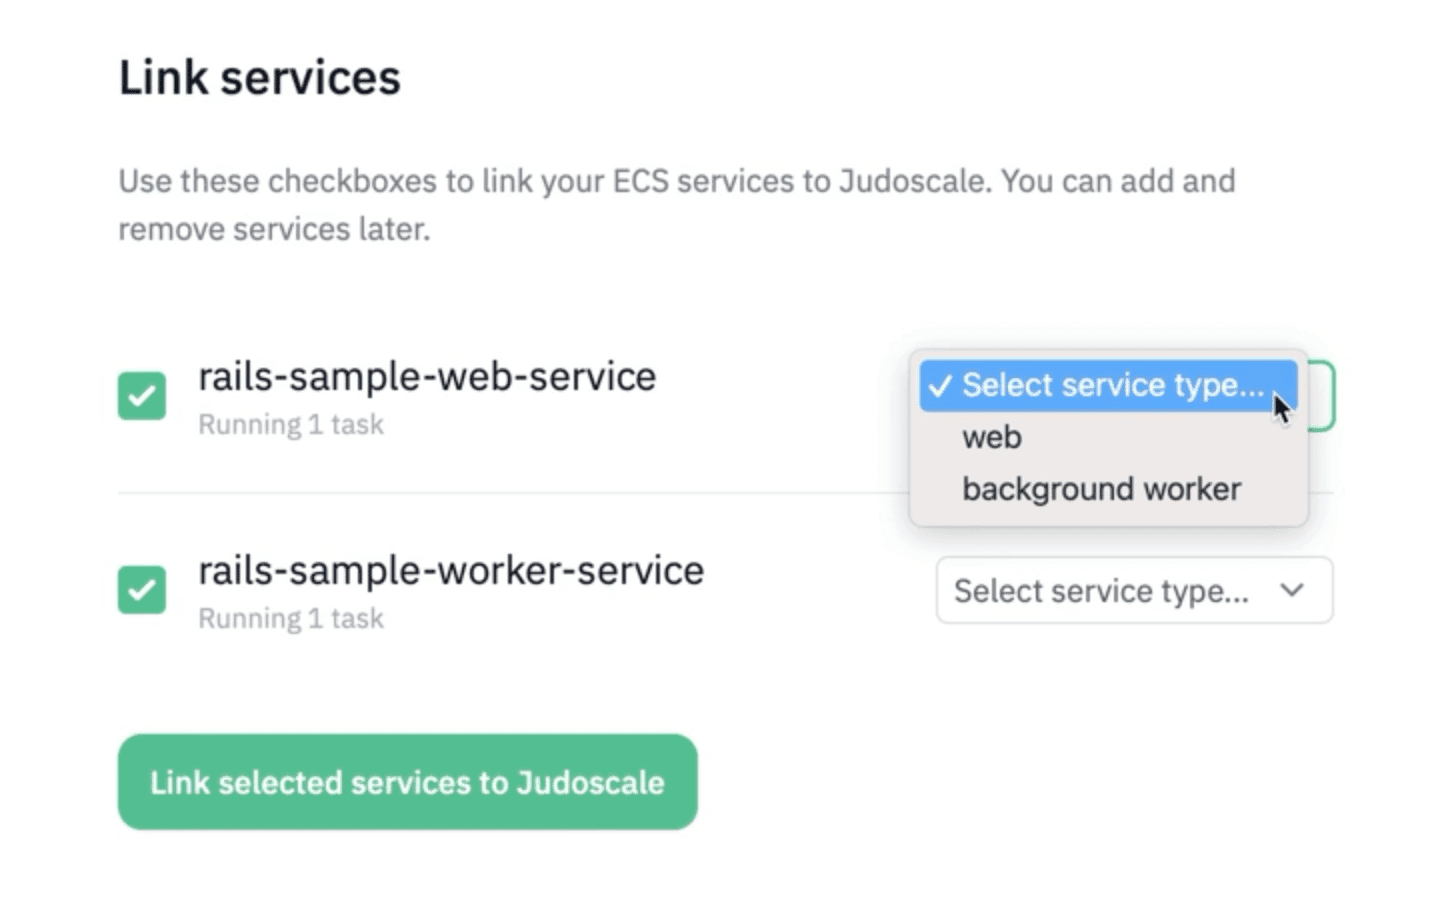
You can link additional services later by clicking “Edit” on a cluster. You can link additional clusters later by clicking “Add cluster” in the Judoscale team dashboard.
After linking services to Judoscale, you’ll be on the Judoscale team dashboard. Here you’ll see all of your linked clusters and services, the number of running tasks, and their autoscaling status within Judoscale. If this is your first time linking a cluster, none will be autoscaling yet.
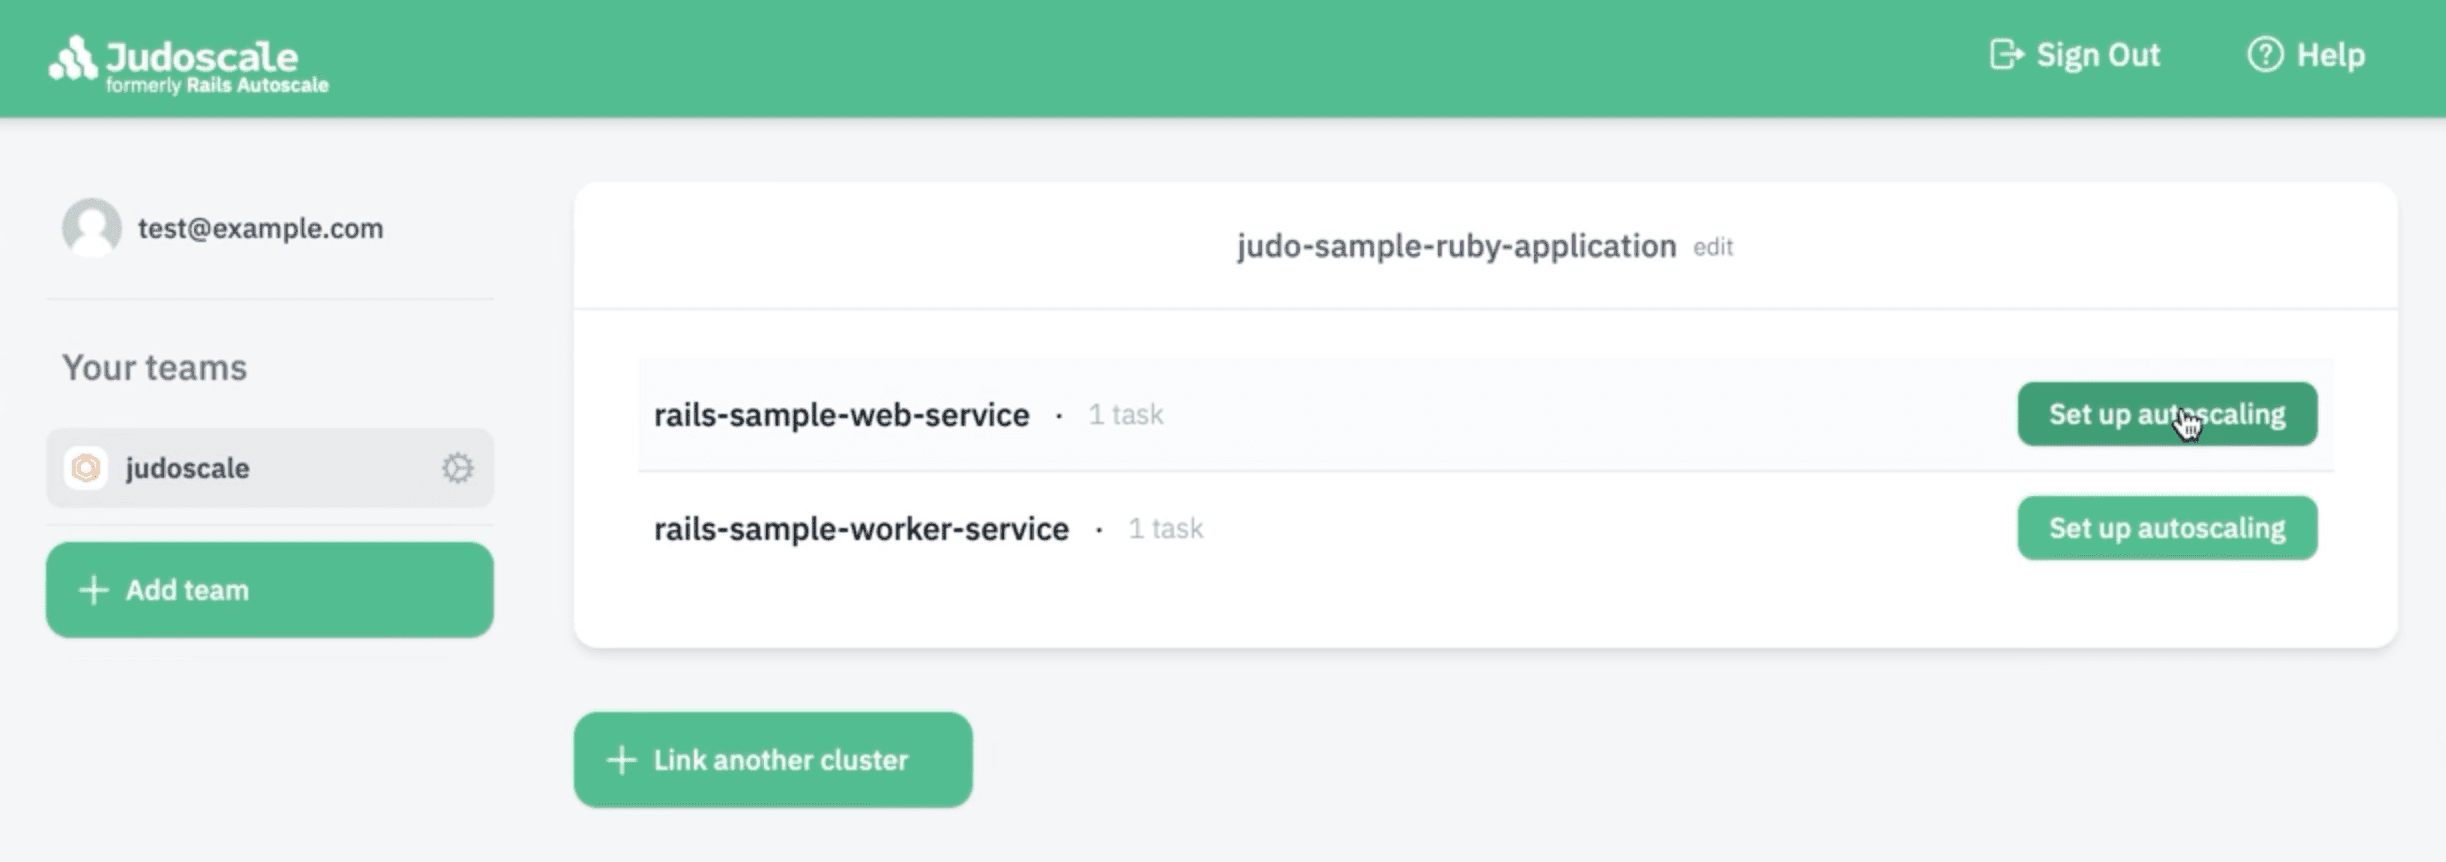
If you’re using another autoscaler such as CloudWatch, you should disable this before enabling autoscaling in Judoscale. Using multiple autoscalers on the same service will cause unpredictable scaling.
Installing the adapter
In the Judoscale team dashboard, click the service you want to autoscale. This takes you to the Scaling page, where you’ll be prompted to install the adapter.
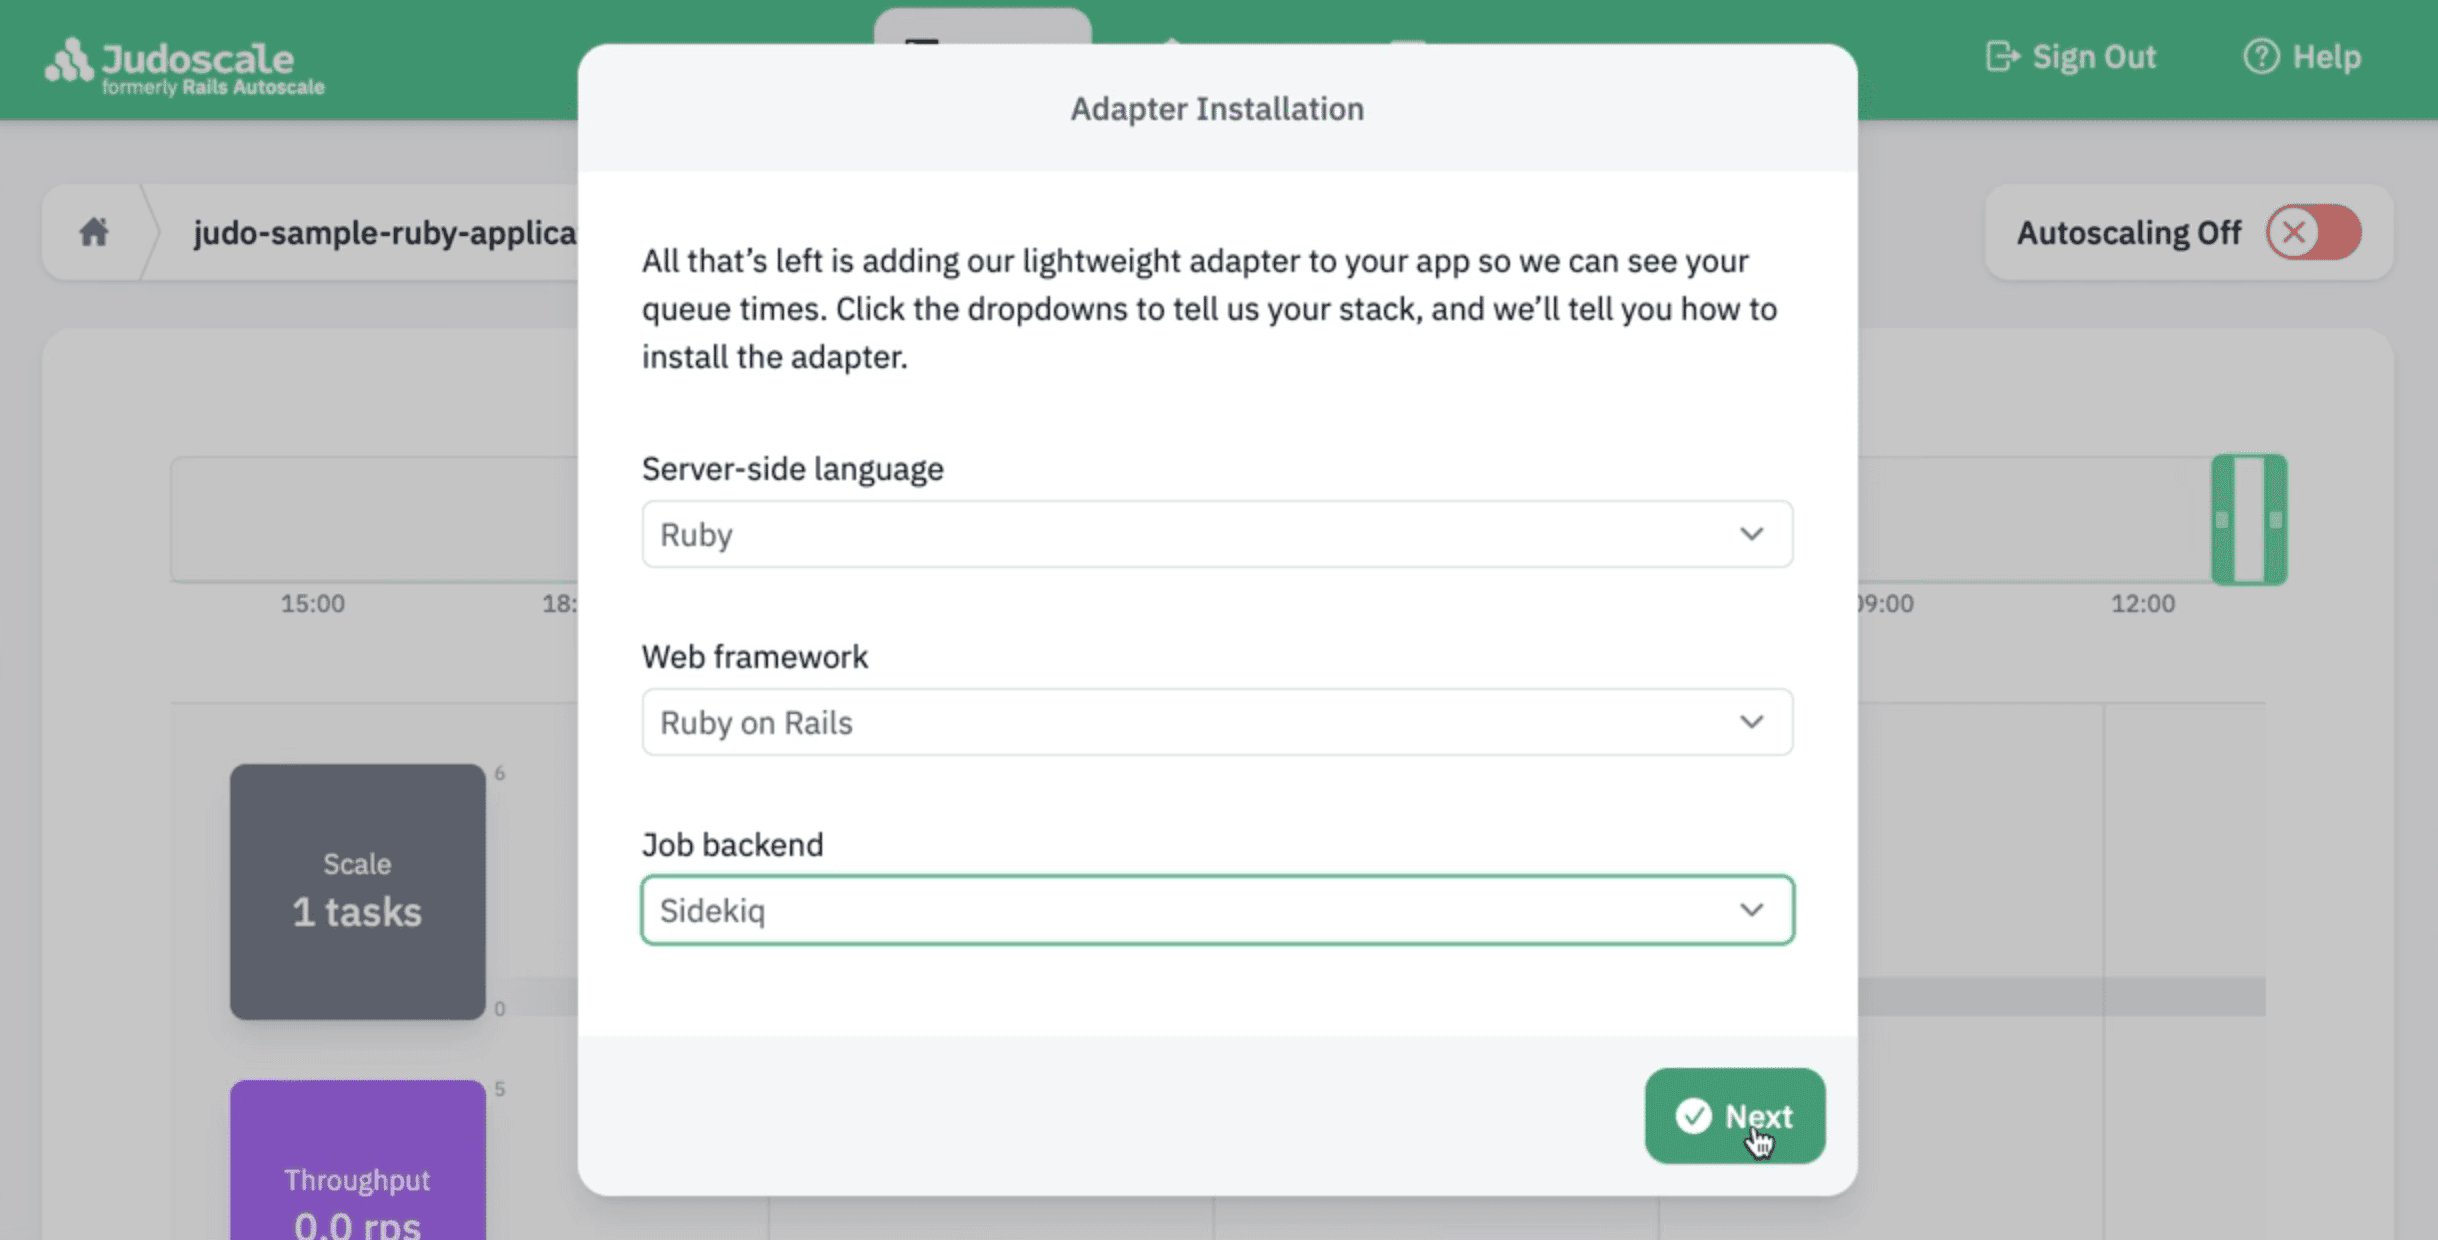
Choose your stack information, and follow the instructions to install the adapter. The adapter is how Judoscale collects queue metrics from your application, similar to a lightweight APM tool.
You’ll also need to set a JUDOSCALE_URL environment variable in your task definition. This is how the Judoscale adapter knows where to send metrics and link those metrics to the correct service.
Running a Sidecar
While the adapter installation alone will allow background job (worker) services to connect to Judoscale, web services require an additional step. In order to correctly determine request queue time for web services, Judoscale reads a unique header on each incoming request: X-Request-Start. Some hosting platforms automatically add this header to every incoming request. Amazon ECS does not. So we'll need to add it ourselves!
Our recommendation is to follow the sidecar pattern, adding a second container to your web service's task definition. This container is essentially a very minimal web-server — NGINX, for example. Its job is to simply add the header and proxy the request over to your application container as if it'd received it in the first place. We covered this more exensively in our blog post, "How Our Amazon ECS Autoscaling Works," but the sidecar pattern is a stable and reliable pattern for header-injection.
We've also made our own sidecar container available from the Amazon Elastic Container Registry if you'd prefer a drop-in solution. This particular container does require that your application be mounted on port 3000. That container can be found here, but you should feel free to build your own in your own container pipeline — the Dockerfile is simply:
FROM nginx:latest

COPY nginx.conf /etc/nginx/conf.d/default.conf
and the nginx.conf is simply:
server {
     listen 80;

     location / {
         proxy_set_header X-Request-Start "t=${msec}";

         proxy_pass http://localhost:3000;
     }
 }
For our particular application, that's all that's required. Since we're running on Fargate instances, all containers running within a single task share their localhost networking.
Please Note
We offer our pre-fab container (and code sample above) only as an example; your specific application configuration may vary. While the sidecar pattern should work to inject headers into any application's web service, you may have differences or preferences in port numbers, inter-container networking, and/or proxy web-server choices. As long as the X-Request-Start header is added to the request before it reaches your application, Judoscale will be able to properly determine your request queue time.
Verify Incoming Metrics
Once you’ve installed the adapter, setup a sidecar (for web services), and deployed your application, Judoscale will begin showing your queue metrics in the Scaling page charts.
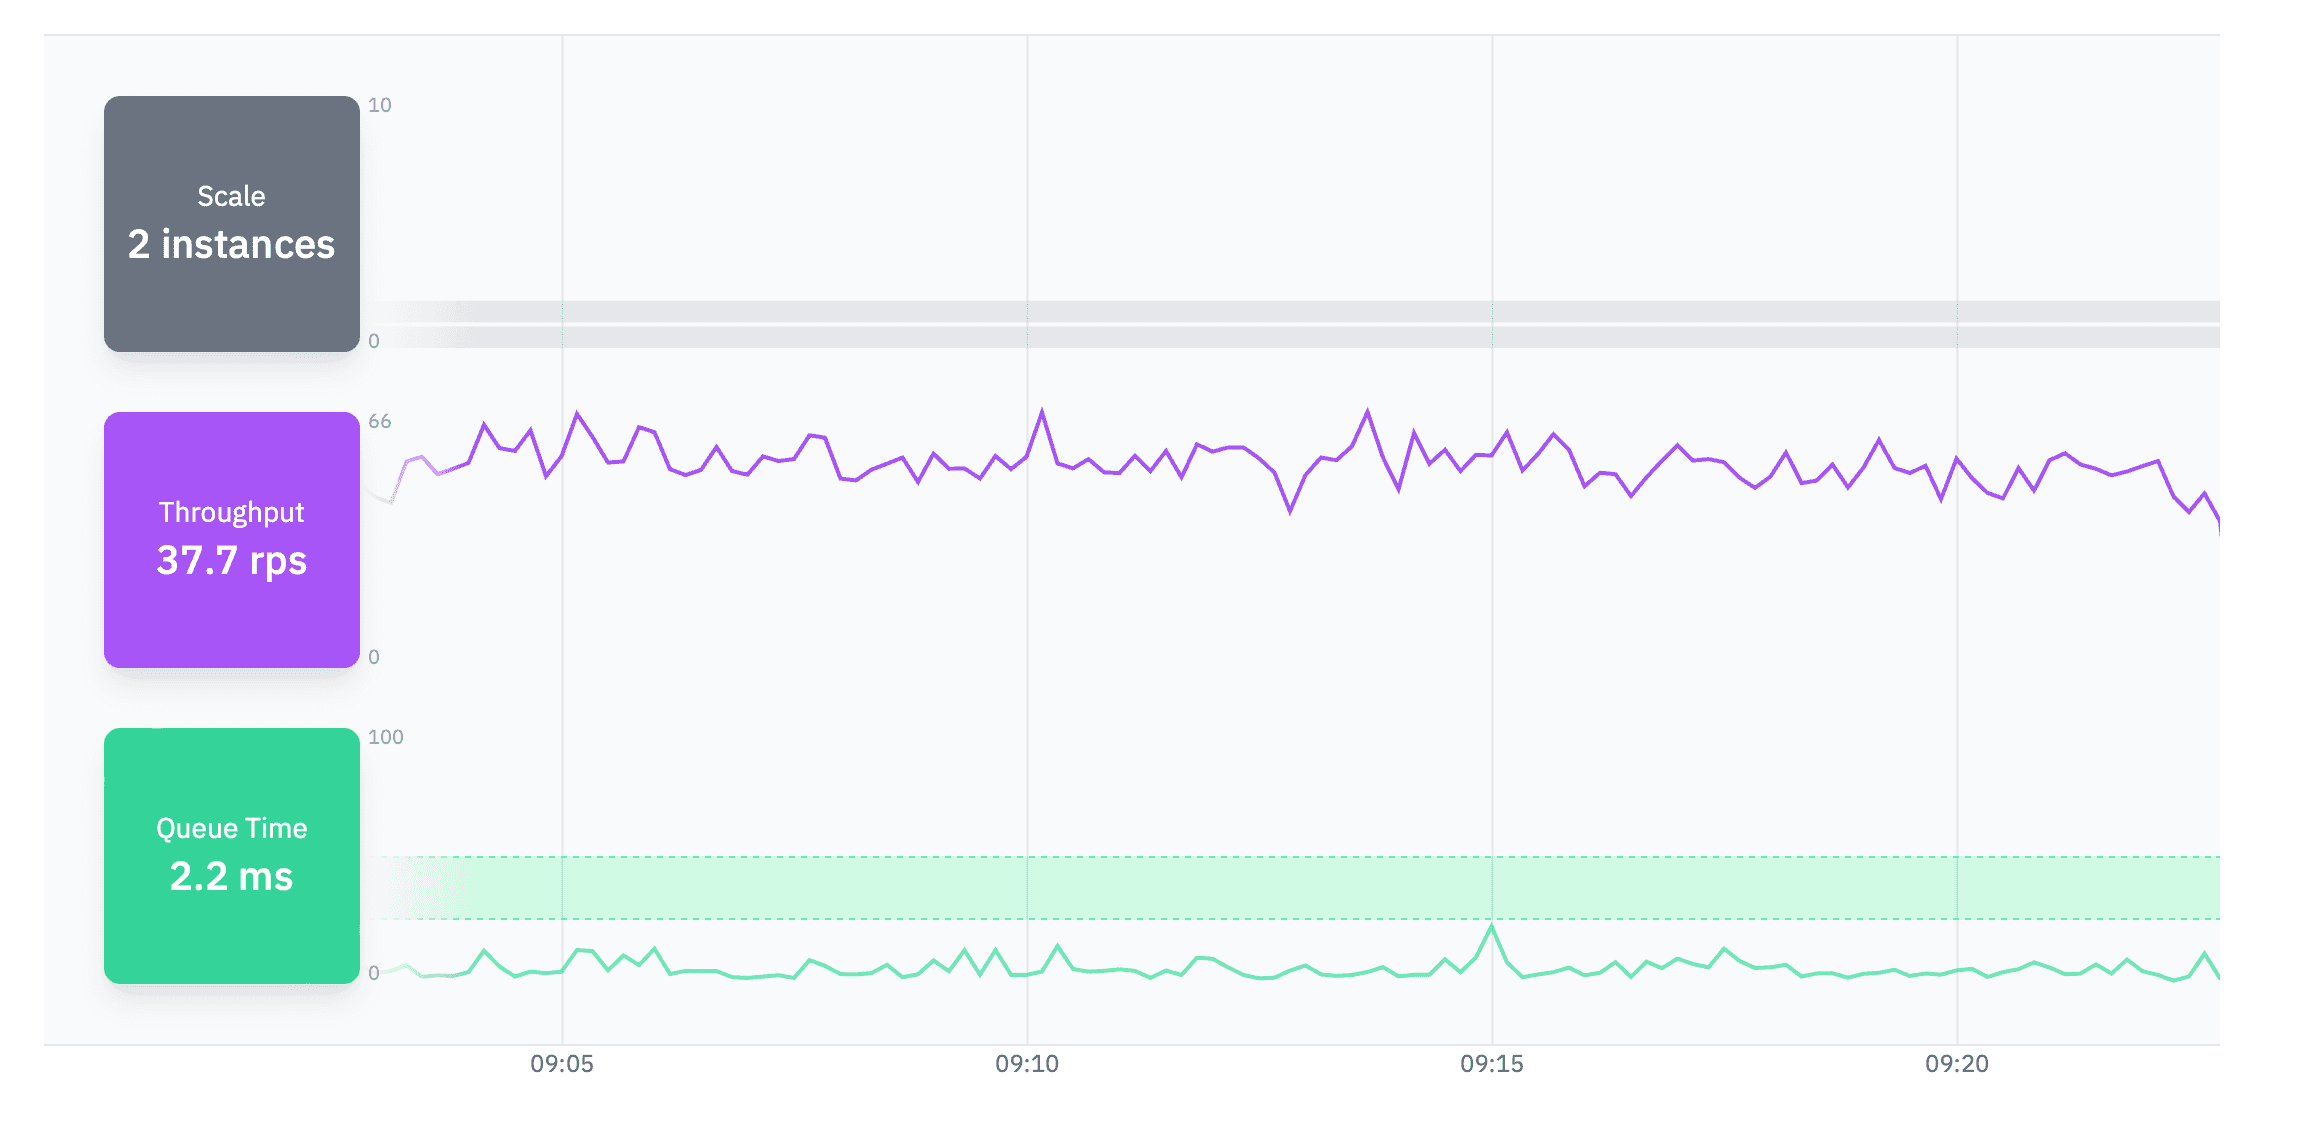
If your web service isn’t receiving traffic, or if your worker service has no jobs waiting in queue, you won’t see any activity in the charts. Let it collect metrics while your app is under load to see queue time information.
Configuring and enabling autoscaling
Now that Judoscale is monitoring your service, you’re ready to autoscale!
Scroll down the Scaling page to review your autoscale settings. The default settings are usually a good starting point for most services, but you’ll want to customize your “tasks” range based on how high and low you’re comfortable scaling.

There’s no “correct” range here. Judoscale defaults to one task as the minimum, but some teams always want multiple tasks running even under light load, so they’ll see the minimum tasks to two or higher. The maximum is really about limiting costs. Remember that under heavy load (high queue times), Judoscale will continue scaling your service up until the max tasks is reached.
Scroll down and click “Save and enable autoscaling”, and that’s it!
Oh no! Something bad happened?
If anything in these docs doesn't work quite right or you have questions, know that you can always reach out to us at help@judoscale.com. Your email goes directly to the Judoscale devs!